In this tutorial we will learn how to design red Christmas balls wallpaper.
Final Image Preview

Create a new file (File>New), having 1024×768 px and 72 dpi.
Next select the Rectangle Tool (U) for representing the background of the picture to be.

Apply for the made layer the next indicated parameters by making a mouse click on the layer we work with on the layers’ panel: Blending Options>Gradient Overlay
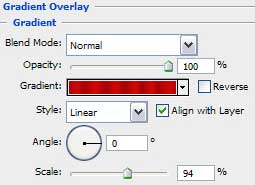
Gradient’s parameters:
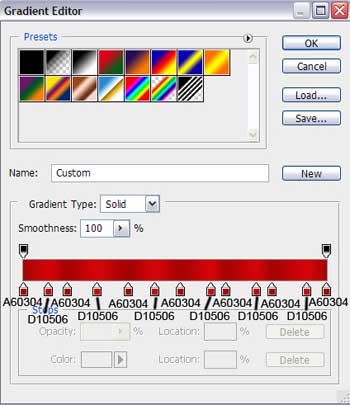

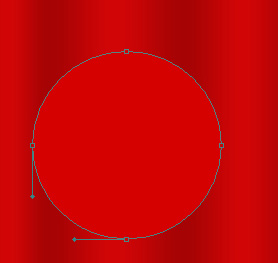
Now we shall try to make a Christmas toy decoration for the Christmas tree, using the Ellipse Tool (U). We’ll begin by representing the primary layer of the decoration, having the color #D50100
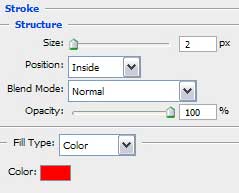
The layer’s parameters: Blending Options>Stroke

Applying the same tool, it’s possible to draw the next layer belonging to the same decoration.

The layer’s parameters: Fill 0%
Blending Options>Inner Glow
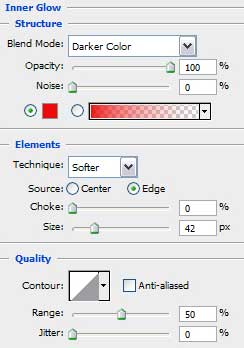
Blending Options>Inner Glow
Blending Options>Gradient Overlay
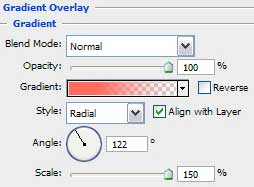 Gradient’s parameters:
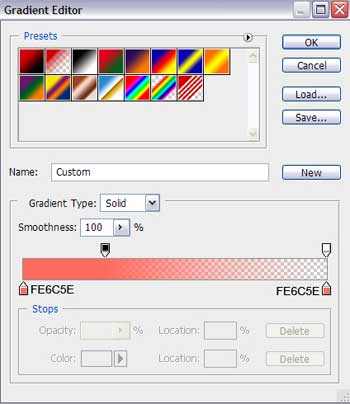

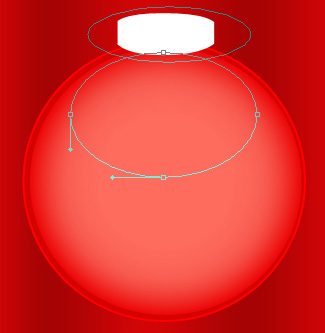
Next we shall draw the top part of the toy decoration, selecting the Ellipse Tool (U) for this operation. Then pressing the Alt button and using the Rectangle Tool (U) on the toy’s right and left sides, we’ll make the toy with the corresponding shape.

On the next level we’ll represent the highlight on the toy decoration, choosing the same Ellipse Tool (U) for drawing the highlight’s surface. After that we’ll press Alt button, while using the same tool to move off the unnecessary elements on the upper part of the highlight.
The layer’s parameters: Fill 0%
Blending Options>Inner Shadow
Blending Options>Inner Shadow

Blending Options>Color Overlay


Next we have to draw the lateral highlight on our Christmas toy decoration, having the color #FF4D3F. Select the same instrument we have used for representing the previous layer and the same method of moving off the unnecessary elements.

Try to make now on the lateral toy’s surface a stripe of white color. In this case we have to apply the Ellipse Tool (U) too and the same operation of erasing the unnecessary elements, described above.

Make a mouse click on this layer on the layers’ panel on Add a Mask selection and apply the Brush Tool (B) of black color to erase those stripe’s parts coming outside the toy’s edges. Set the next parameters for the processed layer: Fill 19%

 Now we shall draw the wire eye reserved for the toy’s thread place, applying the Rounded Rectangle Tool (U) (radius of 20 px). Press Alt button while using the Rectangle Tool (U) for cutting out the wire eye.
The layer’s parameters: Fill 0%
Blending Options>Stroke
Blending Options>Stroke


Using the Line Tool (U), try to represent now the thread of white color.


Next we’ll combine in a group all the layers composing the toy decoration with its thread (press Ctrl button for marking out the corresponding layers and then hold on left mouse’s button to take down the accentuated layers on Create a new group selection). Make two copies of the last made group and choose the Free Transform option to place the copies as it is indicated next image:

Download out of Internet a set of ready to use brushes for Adobe Photoshop, named dw_flake.
Create after that a new layer (Create new layer) and choose the Brush Tool (B) out of the downloaded set to represent along the picture’s edges several snowflakes of different shapes and sizes:
Create after that a new layer (Create new layer) and choose the Brush Tool (B) out of the downloaded set to represent along the picture’s edges several snowflakes of different shapes and sizes:


On the next layer we have to apply again the mentioned set of brushes to represent the snowflakes of smaller sizes, having the white color too.

Create a new layer and try to draw the snowflakes of the white color between the toys themselves, choosing the same set of brushes, used before.

Create a new layer again on which we’ll apply the Brush Tool (B) of dw_flake set to represent the snowflakes on the lateral stripe of the Christmas toy decoration.

Make two copies of the last made layer and use the Free Transform option again to place the snowflakes’ copies on the lateral sides of the other toys.
Finished!
View full size here.
Download brushes here.


ليست هناك تعليقات:
إرسال تعليق